| This is NOT an official AWS Quick Start. The project is built according to AWS Quick Start Contributor’s Guide but it is not approved by AWS and Jaeger teams. |
Jaeger on the AWS Cloud
Quick Start Reference Deployment

DRAFT DOCUMENT / UNOFFICIAL GUIDANCE
This portion of the deployment guide is located at docs/partner_editable/__settings.adoc_
April 2022 |
| Visit our GitHub repository for source files and to post feedback, report bugs, or submit feature ideas for this Quick Start. |
This Quick Start was created by Cloud Native Computing Foundation in collaboration with Amazon Web Services (AWS). Quick Starts are automated reference deployments that use AWS CloudFormation templates to deploy key technologies on AWS, following AWS best practices.
Overview
This portion of the deployment guide is located at docs/partner_editable/overview_target_and_usage.adoc

This Quick Start reference deployment guide provides step-by-step instructions for deploying Jaeger on the AWS Cloud. Jaeger, inspired by Dapper and OpenZipkin, is a distributed tracing platform created by Uber Technologies and donated to Cloud Native Computing Foundation. It can be used for monitoring microservices-based distributed systems:
This Quick Start helps you to deploy a highly available Jaeger - open source, end-to-end distributed tracing backend on the Amazon Web Services (AWS) Cloud. You can use the AWS CloudFormation templates included with the Quick Start to deploy Jaeger in your AWS account in about 10-30 minutes. The Quick Start automates the following (see Deployment options):
This Quick Start is for users who want a repeatable, customizable reference deployment for Jaeger using AWS CloudFormation. You can also use the provided AWS CloudFormation templates as a starting point for your own implementation. |
| Amazon may share user-deployment information with the AWS Partner that collaborated with AWS on the Quick Start. |
Jaeger on AWS
This portion of the deployment guide is located at docs/partner_editable/product_description.adoc
This Quick Start integrates Jaeger with the following AWS services:
-
AWS CloudFormation - infrastructure as code Jaeger deployment
-
Amazon ECS - highly available Fargate cluster
-
Amazon CloudWatch - integration for logs and metrics
-
Amazon Route53 - DNS configuration
-
AWS Certificate Manager - integration for TLS certificates
-
Amazon Managed Service for Prometheus - managed Prometheus for centralized metrics collection
In addition, depending on selected Jaeger storage backend, the Quick Start uses the following AWS services:
-
Amazon Opensearch - highly available search cluster
-
Amazon Keyspaces (for Apache Cassandra) - a scalable, highly available, and managed Apache Cassandra–compatible database service
AWS costs
You are responsible for the cost of the AWS services and any third-party licenses used while running this Quick Start. There is no additional cost for using the Quick Start.
The AWS CloudFormation templates for Quick Starts include configuration parameters that you can customize. Some of the settings, such as the instance type, affect the cost of deployment. For cost estimates, see the pricing pages for each AWS service you use. Prices are subject to change.
| After you deploy the Quick Start, create AWS Cost and Usage Reports to deliver billing metrics to an Amazon Simple Storage Service (Amazon S3) bucket in your account. These reports provide cost estimates based on usage throughout each month and aggregate the data at the end of the month. For more information, see What are AWS Cost and Usage Reports? |
Software licenses
This portion of the deployment guide is located at docs/partner_editable/licenses.adoc
Jaeger uses Apache 2.0 License.
Architecture
This portion of the deployment guide is located at docs/partner_editable/architecture.adoc
Networking
This Quick Start deploys a highly available architecture that spans two or more Availability Zones. A VPC is configured with public and private subnets, according to AWS bets practices, to provide you with your own virtual network on AWS.
| This Quick Start relies on quickstart-aws-vpc to provides a networking foundation for Jaeger infrastructure on AWS. Refer to this project for additional details on VPC design. |
Storage Backend
Jaeger supports multiple options for persisted storage backends. This Quick Start supports the following backend options:
-
Elasticsearch - production-ready storage backend, recommended for large scale production deployments by the Jaeger team.
-
In-memory storage - the in-memory storage is not intended for production workloads. It’s intended as a simple solution to get started quickly and data will be lost once the process is gone.
See the following sections for details on target AWS architecture that this Quick Start deploys, depending on the storage type selected.
Elasticsearch storage backend architecture
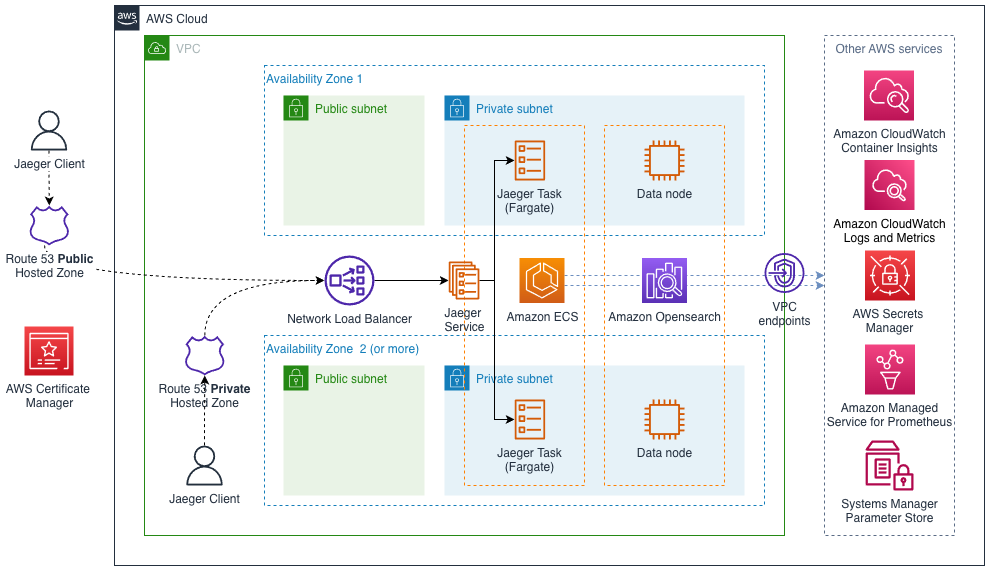
Elasticsearch storage backend is the recommended option for large scale production Jaeger deployments. The Quick Start exposes a number of parameters to provision an Elasticsearch cluster adjusted for your needs - see Parameter reference for additional details.
With all the optional integrations disabled, the following components are deployed:
-
Amazon OpenSearch cluster
-
ECS Fargate cluster
-
ECS Service for Jaeger Collector service. The service runs tasks distributed across multiple Availability Zones and distributes traffic between them
-
ECS Service for Jaeger Query service. The service runs tasks distributed across multiple Availability Zones and distributes traffic between them
-
ECS Task, triggered according to provided cron schedule (once a day, by default). The purpose of the job is to build the connection graph between services, based on the collected traces. See Jaeger documentation for additional details on this job.
-
Network Load Balancer that exposes Jaeger Query service to the clients
In-memory storage backend architecture
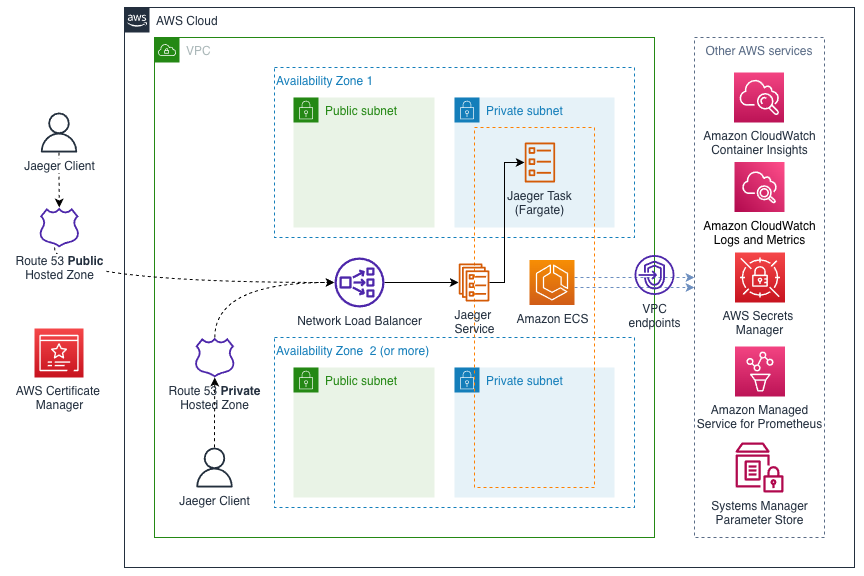
Jaeger deployed with in-memory storage is not highly available / resilient. As in-memory storage can’t be shared between containers, there is only one Jaeger ECS task running at any given moment of time. If the task is terminated, all traces are lost.
This is the simplest Jaeger deployment on AWS this Quick Start provides. With all the optional integrations disabled, the following components are deployed:
-
ECS Fargate cluster
-
ECS Service that runs a single Jaeger task using [https://www.jaegertracing.io/docs/1.32/deployment/#all-in-one]all-in-one Jaeger distribution
-
Network Load Balancer that exposes Jaeger Query service to the clients
In-memory storage backend is ideal for rapid prototyping, proof of concept work, experimentation, etc.
DNS configuration
Jaeger can be deployed in multiple different ways, depending on the networking requirments. This Quick Start provides a number of configuration parameters to accomodate different scenarious. The following sections provide additional information on different network topologies.
Network Load Balancer visibility
By default: internet-facing
Network Load Balancer can be provisioned as internet-facing
(with a public IP address) or as internal (accessible only from within VPC).
Network load balancer sits in front of ECS services and exposes a number of ports for the clients:
Port |
Protocol |
Description |
14250 |
gRPC |
accepts spans in protobuf format |
14268 |
HTTP |
accepts spans in Thrift format |
14269 |
HTTP |
[in-memory storage backend]: health check at |
[elasticsearch storage backend]: health check at |
||
16687 |
HTTP |
[elasticsearch storage backend only]: health check at |
80 / 443 |
HTTP |
Jaeger UI at |
| The load balancer is provisioned in public VPC subnets (public here does not necessarily mean that it is publicly accessible) in contrast to the other Jaeger services (ECS services and tasks, Elasticseatch cluster) that run in private VPC subnets. |
Public DNS
By default: disabled
An optional public DNS name can be configured for the load balancer - this would make it possible
to use a custom domain name, like jaeger.mydoman.com. This Quick Start can create a Roure 53 record
in a public hosted zone to support this scenario. There are several ways to achieve this:
-
use an existing Route 53 public hosted zone - you can provide the hosted zone ID as a parameter for the Quickstart
-
create a new public hosted zone and provision Jaeger DNS record there.
| This Quick Start does not set up subdomain delegation (NS records). If you requested a new hosted zone for a subdomain, you would need to configure the delegation. |
Private DNS
By default: disabled
An optional private DNS name can be configured for the load balancer and associated with the VPC - this would make it possible to use a custom domain name, like jaeger.mydoman.com from within your VPC. Usually, this makes sense when an internal load balancer is used.
This Quick Start can create a Roure 53 record in a private hosted zone to support this scenario. There are several ways to achieve this:
-
use an existing Route 53 private hosted zone - you can provide the hosted zone ID as a parameter for the Quickstart
-
create a new private hosted zone and provision Jaeger DNS record there.
| This Quick Start does not set up subdomain delegation (NS records). If you requested a new hosted zone for a subdomain, you would need to configure the delegation. |
TLS certificates
By default: disabled
Prerequisite: Public DNS has to be configured
An optional TLS certificate can be associated with the load balancer to enable encryption in transit for Jaeger clients. This is a highly recommended setup.
The Quick Start provides multiple options to enable the encryption:
-
use an existing ACM certificate - you can provide an ARN for the certificate as a parameter for the Quick Start
-
create new ACM certificate and associate it with the load balancer.
| If a new certificate is requested, the Quick Start performs DNS validation, i.e. validation of DNS CNAME record created in a public hosted zone. If ACM can’t validate the record, the Quick Start deployment will eventually fail. Keep this in mind if your hosted zone is not internet-reachable (this may be the case when you requested a new public zone for a subdomain but DNS delegation is not configured yet). |
Container Insights integration
By default: disabled
Exporting Jaeger metrics
By default: disabled
Jaeger services expose Prometheus metrics that may be useful to assess the health of the telemetry backend. The Quick Start can be optionally configured to expose these metrics and export them to Amazon Managed Service for Prometheus (AMS). This is achieved by deploying an ECS Service with ADOT collector that scrapes the metrics from Jaeger services and pushes them to AMS. You can configure the QuickStart to:
-
use an existing AMS workspace for export - you can provide an ARN for the workspace as a parameter for the Quick Start
-
create a new workspace
Further, if metrics export is enabled, additional AWS-specific metrics from ECS cluster are exported to AWS CloudWatch:
-
ecs.task.memory.utilized -
ecs.task.memory.reserved -
ecs.task.cpu.utilized -
ecs.task.cpu.reserved -
ecs.task.network.rate.rx -
ecs.task.network.rate.tx -
ecs.task.storage.read_bytes -
ecs.task.storage.write_bytes
You can find the full list of supported metrics here https://pkg.go.dev/github.com/open-telemetry/opentelemetry-collector-contrib/receiver/awsecscontainermetricsreceiver#section-readme
Planning the deployment
Specialized knowledge
This deployment requires a moderate level of familiarity with AWS services. If you’re new to AWS, see Getting Started Resource Center and AWS Training and Certification. These sites provide materials for learning how to design, deploy, and operate your infrastructure and applications on the AWS Cloud.
This portion of the deployment guide is located at docs/partner_editable/specialized_knowledge.adoc
This Quick Start assumes familiarity with Jaeger architecture and high-level understanding of available deployment opitons. |
AWS account
If you don’t already have an AWS account, create one at https://aws.amazon.com by following the on-screen instructions. Part of the sign-up process involves receiving a phone call and entering a PIN using the phone keypad.
Your AWS account is automatically signed up for all AWS services. You are charged only for the services you use.
Technical requirements
Before you launch the Quick Start, review the following information and ensure that your account is properly configured. Otherwise, deployment might fail.
Resource quotas
If necessary, request service quota increases for the following resources. You might need to request increases if your existing deployment currently uses these resources and if this Quick Start deployment could result in exceeding the default quotas. The Service Quotas console displays your usage and quotas for some aspects of some services. For more information, see What is Service Quotas? and AWS service quotas.
This portion of the deployment guide is located at docs/partner_editable/service_limits.adoc
Baseline resources:
Resource |
This deployment uses |
VPCs |
1 |
Elastic IP addresses |
2 / 3 (depending on the number of AZs) |
Network Load Balancers |
1 |
ECS clusters |
1 |
OpenSearch clusters |
1 |
IAM roles |
8 |
Optional resources:
Resource |
This deployment uses |
Route 53 public hosted zone |
1 |
Route 53 private hosted zone |
1 |
ACM certificate |
1 |
Amazon Managed Service for Prometheus workspace |
1 |
Supported AWS Regions
For any Quick Start to work in a Region other than its default Region, all the services it deploys must be supported in that Region. You can launch a Quick Start in any Region and see if it works. If you get an error such as “Unrecognized resource type,” the Quick Start is not supported in that Region.
For an up-to-date list of AWS Regions and the AWS services they support, see AWS Regional Services.
| Certain Regions are available on an opt-in basis. For more information, see Managing AWS Regions. |
IAM permissions
Before launching the Quick Start, you must sign in to the AWS Management Console with IAM permissions for the resources that the templates deploy. The AdministratorAccess managed policy within IAM provides sufficient permissions, although your organization may choose to use a custom policy with more restrictions. For more information, see AWS managed policies for job functions.
Deployment options
This portion of the deployment guide is located at docs/partner_editable/deployment_options.adoc
This Quick Start provides two deployment options:
The Quick Start provides separate templates for these options. It also lets you configure Classless Inter-Domain Routing (CIDR) blocks, instance types, and Jaeger settings, as discussed later in this guide. |
This portion of the deployment guide is located at docs/partner_editable/pre-reqs.adoc
Deployment steps
This portion of the deployment guide is located at docs/partner_editable/deploy_steps.adoc
Sign in to your AWS account
-
Sign in to your AWS account at https://aws.amazon.com with an IAM user role that has the necessary permissions. For more information, see Planning the deployment, earlier in this guide.
-
Ensure that your AWS account is configured correctly, as discussed in the Technical requirements section.
-
Use the Region selector in the navigation bar to choose the AWS Region where you want to deploy Jaeger.
Launch the Quick Start (while in Developer Preview)
-
Choose one of the available options to launch the AWS CloudFormation template into your AWS account. For help with choosing an option, see Deployment options, earlier in this guide.
-
Download Jaeger Quick Start CloudFormation templates from Releases page
-
Upload the templates preserving folder structure to S3 bucket in your AWS account
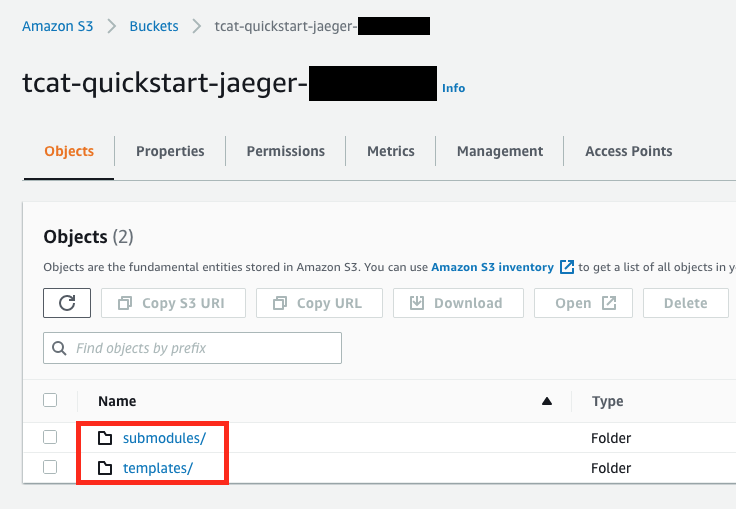
-
Get object URL for either
jaeger-entry-new-vpc.template.yamlorjaeger-entry-existing-vpc.template.yamlentry template fromtemplatesfolder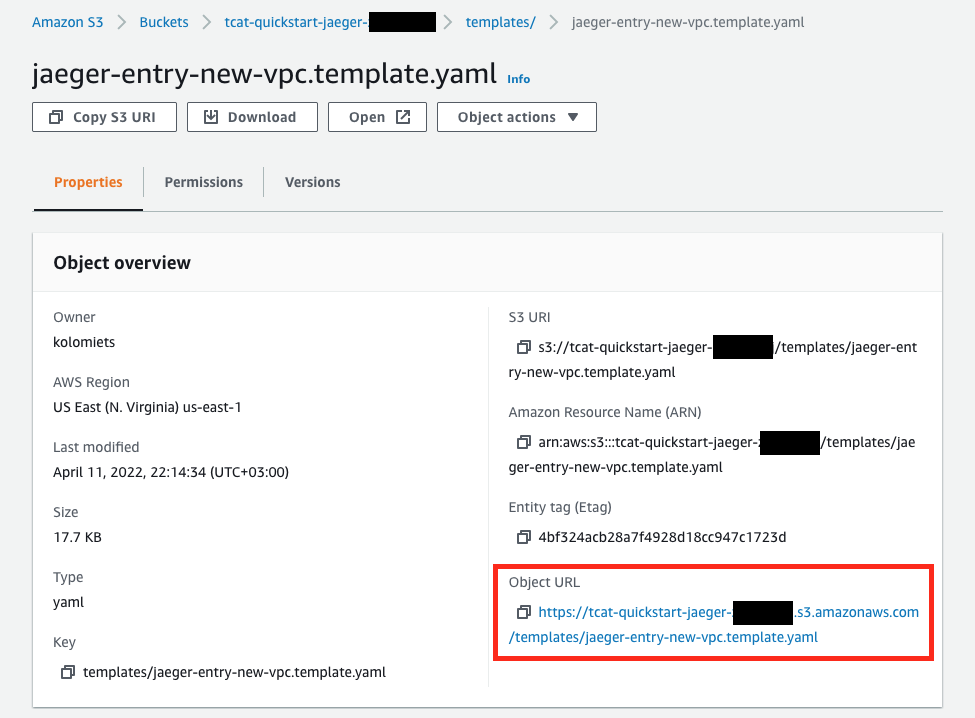
-
Go to AWS CloudFormation console - select the region you want to deploy the Quick Start to and click Create Stack → With new resources
-
Use object URL for the entry template as Amazon S3 URL, click Next

-
On the Specify stack details page, change the stack name if needed. Review the parameters for the template, and provide values for any parameters that require input. For all other parameters, review the default settings, and customize them as necessary. Make sure that AWS Quick Start configuration parameters correctly reflect information about your S3 bucket. Click Next when ready
-
On the Configure stack options page, you can specify tags (key-value pairs) for resources in your stack and set advanced options. When you’re done, choose Next.
-
On the Review page, review and confirm the template settings. Under Capabilities, select the two check boxes to acknowledge that the template creates IAM resources and might require the ability to automatically expand macros.
-
Choose Create stack to deploy the stack.
-
Monitor the status of the stack. When the status is CREATE_COMPLETE, the Jaeger deployment is ready.
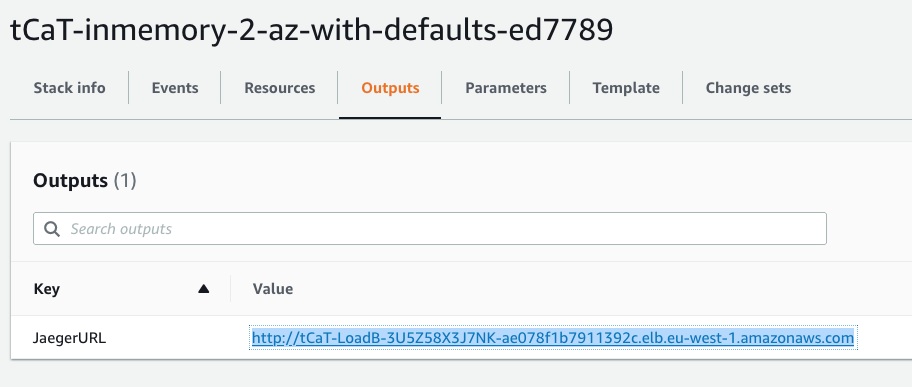
-
Use the values displayed in the Outputs tab for the stack, as shown below, to view the created resources. Click JaegerURL output value to open Jaeger web interface.
+
This portion of the deployment guide is located at docs/partner_editable/additional_info.adoc
Best practices for using Jaeger on AWS
Add any best practices for using the software.
Security
Add any security-related information.
Other useful information
Add any other details that will help the customer use the software on AWS.
This portion of the deployment guide is located at docs/partner_editable/faq_troubleshooting.adoc
FAQ
| Refer to the official Jaeger FAQ for the latest updates. |
Q. I encountered a CREATE_FAILED error when I launched the Quick Start.
A. If AWS CloudFormation fails to create the stack, we recommend that you relaunch the template with Rollback on failure set to No. (This setting is under Advanced in the AWS CloudFormation console, Options page.) With this setting, the stack’s state is retained and the instance is left running, so you can troubleshoot the issue. (For Windows, look at the log files in %ProgramFiles%\Amazon\EC2ConfigService and C:\cfn\log.)
Important: When you set Rollback on failure to No, you continue to incur AWS charges for this stack. Please make sure to delete the stack when you finish troubleshooting.
For additional information, see Troubleshooting AWS CloudFormation on the AWS website.
Q. I encountered a size limitation error when I deployed the AWS CloudFormation templates.
A. We recommend that you launch the Quick Start templates from the links in this guide or from another S3 bucket. If you deploy the templates from a local copy on your computer or from a location other than an S3 bucket, you might encounter template size limitations. For more information about AWS CloudFormation quotas, see the AWS documentation.
Troubleshooting
| Refer to the official Jaeger Troubleshooting page. |
Customer responsibility
After you successfully deploy this Quick Start, confirm that your resources and services are updated and configured — including any required patches — to meet your security and other needs. For more information, see the AWS Shared Responsibility Model.
Parameter reference
| Unless you are customizing the Quick Start templates for your own deployment projects, keep the default settings for the parameters labeled Quick Start S3 bucket name, Quick Start S3 bucket Region, and Quick Start S3 key prefix. Changing these parameter settings automatically updates code references to point to a new Quick Start location. For more information, see the AWS Quick Start Contributor’s Guide. |
Launch into a new VPC
| Parameter label (name) | Default value | Description |
|---|---|---|
Environment name
( |
|
Name of the Jaeger environment (leave empty to use dynamically generated name). Environment name is used to generate unique resource names. Multiple Jaeger environments with different names can be deployed in the same region. |
| Parameter label (name) | Default value | Description |
|---|---|---|
Number of Availability Zones
( |
|
Number of Availability Zones to use in the VPC. This must match your selections in the list of Availability Zones parameter. |
VPC CIDR
( |
|
CIDR block for the VPC. |
Private subnet 1 CIDR
( |
|
CIDR block for private subnet 1 located in Availability Zone 1. |
Private subnet 2 CIDR
( |
|
CIDR block for private subnet 2 located in Availability Zone 2. |
Private subnet 3 CIDR
( |
|
CIDR block for private subnet 3, located in Availability Zone 3. |
Public subnet 1 CIDR
( |
|
CIDR block for the public (DMZ) subnet 1 located in Availability Zone 1. |
Public subnet 2 CIDR
( |
|
CIDR block for the public (DMZ) subnet 2 located in Availability Zone 2. |
Public subnet 3 CIDR
( |
|
CIDR block for the public (DMZ) subnet 3, located in Availability Zone 3. |
Create VPC endpoints
( |
|
Choose "Yes" to keep traffic between Jaeger and AWS services inside VPC. |
| Parameter label (name) | Default value | Description |
|---|---|---|
Jaeger version
( |
|
Version of the Jaeger release. |
Jaeger storage backend
( |
|
Jaeger storage backend. |
Use internal load balancer
( |
|
Choose "Yes" to deploy Jaeger load balancer in private VPC subnets. |
Jaeger CPU
( |
|
Jaeger CPU. See https://docs.aws.amazon.com/AmazonECS/latest/developerguide/task-cpu-memory-error.html for supported values. |
Jaeger Memory
( |
|
Jaeger Collector Memory. See https://docs.aws.amazon.com/AmazonECS/latest/developerguide/task-cpu-memory-error.html for supported values. |
Minimum number of Jaeger instances
( |
|
Minimum number of Jaeger instances. Note that InMemory Jaeger always runs as a single instance. |
Maximum number of Jaeger instances
( |
|
Maximum number of Jaeger instances. Note that InMemory Jaeger always runs as a single instance. |
| Parameter label (name) | Default value | Description |
|---|---|---|
OpenTelemetry Collector
( |
|
Choose "Yes" to deploy OpenTelemetry Collector in fron of Jaeger. |
OpenTelemetry Collector image
( |
|
Docker image for the OpenTelemetry Collector |
OpenTelemetry Collector version
( |
|
Version of the OpenTelemetry Collector. |
Memory ballast percentage
( |
|
Memory balast percentage. "0" disables memory ballast. See https://github.com/open-telemetry/opentelemetry-collector/blob/main/extension/ballastextension/README.md for further details. |
Enable zPages
( |
|
Choose "Yes" to enable zPages for OpenTelemetry Collector. See https://github.com/open-telemetry/opentelemetry-collector/tree/main/extension/zpagesextension for further details. |
Enable pprof
( |
|
Choose "Yes" to enable pprof for OpenTelemetry Collector. See https://github.com/open-telemetry/opentelemetry-collector-contrib/tree/main/extension/pprofextension for further details. |
Enable Service Performance Monitoring
( |
|
Choose "Yes" to enable service performance monitoring metrics. See https://www.jaegertracing.io/docs/1.34/spm/ for further details. |
OpenTelemetry Collector CPU
( |
|
OpenTelemetry Collector CPU. See https://docs.aws.amazon.com/AmazonECS/latest/developerguide/task-cpu-memory-error.html for supported values. |
OpenTelemetry Collector Memory
( |
|
OpenTelemetry Collector Memory. See https://docs.aws.amazon.com/AmazonECS/latest/developerguide/task-cpu-memory-error.html for supported values. |
Minimum number of OpenTelemetry Collector instances
( |
|
Minimum number of OpenTelemetry Collector instances. |
Maximum number of OpenTelemetry Collector instances
( |
|
Maximum number of OpenTelemetry Collector instances. |
| Parameter label (name) | Default value | Description |
|---|---|---|
Elasticsearch version
( |
|
The version of OpenSearch to use. The value must be in the format OpenSearch_X.Y or Elasticsearch_X.Y. For information about supported versions, see https://docs.aws.amazon.com/opensearch-service/latest/developerguide/what-is.html#choosing-version. |
Number of data nodes
( |
|
The number of data nodes (instances) to use in the OpenSearch Service domain. |
Data node instance type
( |
|
The instance type for your data nodes. For valid values, see https://docs.aws.amazon.com/opensearch-service/latest/developerguide/supported-instance-types.html. |
Data node volume size
( |
|
The size (in GiB) of the EBS volume for each data node. |
Data node volume type
( |
|
The EBS volume type to use with the OpenSearch Service domain, such as standard, gp2, or io1. |
Dependencies job schedule
( |
|
cron expression that is used to re-build service dependencies (default is daily at 1am). |
Dependencies job time range
( |
|
How far in the past the job should look to for spans, the maximum and default is |
| Parameter label (name) | Default value | Description |
|---|---|---|
Enable Amazon CloudWatch Container Inrights
( |
|
Choose "Yes" to enable integration with CloudWatch Container Insights. Container Insights ensure performance metrics are available in CloudWatch. |
Export Prometheus metrics
( |
|
Choose "UseExisting" to provide Amazon Managed Service for Prometheus workspace Id where Jaeger metrics should be exported. Choose "CreateNew" to provision a Amazon Managed Service for Prometheus workspace and export Jaeger metrics there. |
Prometheus Workspace Id
( |
|
Provide Amazon Managed Service for Prometheus workspace Id if you selected "UseExisting" above. |
Metrics scrape interval
( |
|
Metrics scrape interval, in seconds |
Metrics scrape timeout
( |
|
Metrics scrape timeout, in seconds |
Collection interval for ECS cluster metrics
( |
|
Collection interval for ECS cluster metrics, in seconds |
| Parameter label (name) | Default value | Description |
|---|---|---|
Domain name
( |
|
The domain name for the Jaeger Query service. |
Subdomain name
( |
|
The subdomain name for the Jaeger Query service. Jaeger will be available at {subdomain}.{domain} URL. |
Public DNS
( |
|
Choose "UseExisting" to provide public hosted zone Id where Jaeger DNS record should be created. Choose "CreateNew" to provision a new Route 53 public hosted zone with provided Domain Name and create Jaeger DNS record there. |
Public Hosted Zone Id
( |
|
Provide Route 53 public hosted zone Id if you selected "UseExisting" above. |
Private DNS
( |
|
Choose "UseExisting" to provide private hosted zone Id where Jaeger DNS record should be created. Choose "CreateNew" to provision a new Route 53 private hosted zone with provided Domain Name and create Jaeger DNS record there. |
Private Hosted Zone Id
( |
|
Provide Route 53 public hosted zone Id if you selected "UseExisting" above. |
Certificate
( |
|
Choose "UseExisting" to provide ACM certificate ARN to use to terminate SSL for Jaeger DNS record. Choose "CreateNew" to provision a new ACM certificate with DNS Domain validation and use it for Jaeger SSL termination. |
Certificate Arn
( |
|
Provide ACM certificate ARN if you selected "UseExisting" above. |
| Parameter label (name) | Default value | Description |
|---|---|---|
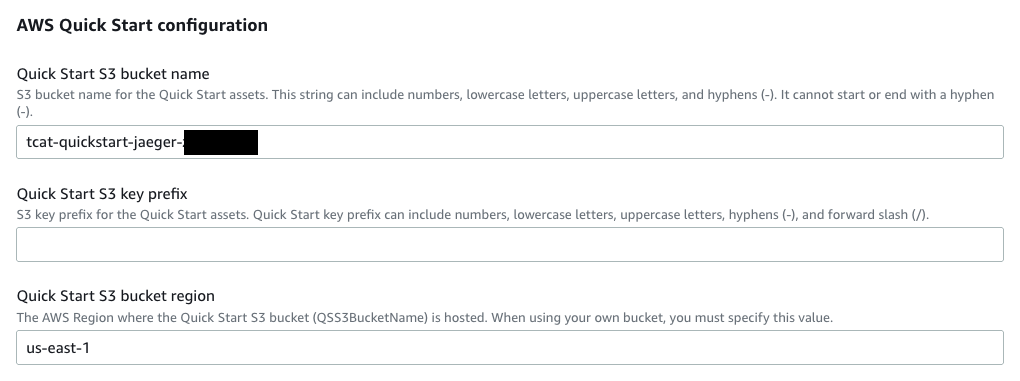
Quick Start S3 bucket name
( |
|
S3 bucket name for the Quick Start assets. This string can include numbers, lowercase letters, uppercase letters, and hyphens (-). It cannot start or end with a hyphen (-). |
Quick Start S3 key prefix
( |
|
S3 key prefix for the Quick Start assets. Quick Start key prefix can include numbers, lowercase letters, uppercase letters, hyphens (-), and forward slash (/). |
Quick Start S3 bucket region
( |
|
The AWS Region where the Quick Start S3 bucket (QSS3BucketName) is hosted. When using your own bucket, you must specify this value. |
Launch into an existing VPC
| Parameter label (name) | Default value | Description |
|---|---|---|
Environment name
( |
|
Name of the Jaeger environment (leave empty to use dynamically generated name). Environment name is used to generate unique resource names. Multiple Jaeger environments with different names can be deployed in the same region. |
| Parameter label (name) | Default value | Description |
|---|---|---|
VPC ID
( |
|
ID of your existing VPC (e.g., vpc-0343606e). |
VPC CIDR
( |
|
CIDR block for the VPC. |
Private subnet 1 ID
( |
|
ID of the private subnet in Availability Zone 1 of your existing VPC (e.g., subnet-fe9a8b32). |
Private subnet 2 ID
( |
|
ID of the private subnet in Availability Zone 2 of your existing VPC (e.g., subnet-be8b01ea). |
Private subnet 3 ID
( |
|
ID of the private subnet in Availability Zone 3 of your existing VPC (e.g., subnet-abd39039). |
Public subnet 1 ID
( |
|
ID of the public subnet in Availability Zone 1 of your existing VPC (e.g., subnet-a0246ccd). |
Public subnet 2 ID
( |
|
ID of the public subnet in Availability Zone 2 of your existing VPC (e.g., subnet-b1236eea). |
Public subnet 3 ID
( |
|
ID of the public subnet in Availability Zone 3 of your existing VPC (e.g., subnet-c3456aba). |
Create VPC endpoints
( |
|
Choose "Yes" to keep traffic between Jaeger and AWS services inside VPC. |
| Parameter label (name) | Default value | Description |
|---|---|---|
Jaeger version
( |
|
Version of the Jaeger release. |
Jaeger storage backend
( |
|
Jaeger storage backend. |
Use internal load balancer
( |
|
Choose "Yes" to deploy Jaeger load balancer in private VPC subnets. |
Jaeger CPU
( |
|
Jaeger CPU. See https://docs.aws.amazon.com/AmazonECS/latest/developerguide/task-cpu-memory-error.html for supported values. |
Jaeger Memory
( |
|
Jaeger Collector Memory. See https://docs.aws.amazon.com/AmazonECS/latest/developerguide/task-cpu-memory-error.html for supported values. |
Minimum number of Jaeger instances
( |
|
Minimum number of Jaeger instances. Note that InMemory Jaeger always runs as a single instance. |
Maximum number of Jaeger instances
( |
|
Maximum number of Jaeger instances. Note that InMemory Jaeger always runs as a single instance. |
| Parameter label (name) | Default value | Description |
|---|---|---|
OpenTelemetry Collector
( |
|
Choose "Yes" to deploy OpenTelemetry Collector in fron of Jaeger. |
OpenTelemetry Collector image
( |
|
Docker image for the OpenTelemetry Collector |
OpenTelemetry Collector version
( |
|
Version of the OpenTelemetry Collector. |
Memory ballast percentage
( |
|
Memory balast percentage. "0" disables memory ballast. See https://github.com/open-telemetry/opentelemetry-collector/blob/main/extension/ballastextension/README.md for further details. |
Enable zPages
( |
|
Choose "Yes" to enable zPages for OpenTelemetry Collector. See https://github.com/open-telemetry/opentelemetry-collector/tree/main/extension/zpagesextension for further details. |
Enable pprof
( |
|
Choose "Yes" to enable pprof for OpenTelemetry Collector. See https://github.com/open-telemetry/opentelemetry-collector-contrib/tree/main/extension/pprofextension for further details. |
Enable Service Performance Monitoring
( |
|
Choose "Yes" to enable service performance monitoring metrics. See https://www.jaegertracing.io/docs/1.34/spm/ for further details. |
OpenTelemetry Collector CPU
( |
|
OpenTelemetry Collector CPU. See https://docs.aws.amazon.com/AmazonECS/latest/developerguide/task-cpu-memory-error.html for supported values. |
OpenTelemetry Collector Memory
( |
|
OpenTelemetry Collector Memory. See https://docs.aws.amazon.com/AmazonECS/latest/developerguide/task-cpu-memory-error.html for supported values. |
Minimum number of OpenTelemetry Collector instances
( |
|
Minimum number of OpenTelemetry Collector instances. |
Maximum number of OpenTelemetry Collector instances
( |
|
Maximum number of OpenTelemetry Collector instances. |
| Parameter label (name) | Default value | Description |
|---|---|---|
Elasticsearch version
( |
|
The version of OpenSearch to use. The value must be in the format OpenSearch_X.Y or Elasticsearch_X.Y. For information about supported versions, see https://docs.aws.amazon.com/opensearch-service/latest/developerguide/what-is.html#choosing-version. |
Number of data nodes
( |
|
The number of data nodes (instances) to use in the OpenSearch Service domain. |
Data node instance type
( |
|
The instance type for your data nodes. For valid values, see https://docs.aws.amazon.com/opensearch-service/latest/developerguide/supported-instance-types.html. |
Data node volume size
( |
|
The size (in GiB) of the EBS volume for each data node. |
Data node volume type
( |
|
The EBS volume type to use with the OpenSearch Service domain, such as standard, gp2, or io1. |
Dependencies job schedule
( |
|
cron expression that is used to re-build service dependencies (default is daily at 1am). |
Dependencies job time range
( |
|
How far in the past the job should look to for spans, the maximum and default is |
| Parameter label (name) | Default value | Description |
|---|---|---|
Enable Amazon CloudWatch Container Inrights
( |
|
Choose "Yes" to enable integration with CloudWatch Container Insights. Container Insights ensure performance metrics are available in CloudWatch. |
Export Prometheus metrics
( |
|
Choose "UseExistingWorkspace" to provide Amazon Managed Service for Prometheus workspace Id where Jaeger metrics should be exported. Choose "CreateNewWorkspace" to provision a Amazon Managed Service for Prometheus workspace and export Jaeger metrics there. |
Prometheus Workspace Id
( |
|
Provide Amazon Managed Service for Prometheus workspace Id if you selected "UseExisting" above. |
Metrics scrape interval
( |
|
Metrics scrape interval, in seconds |
Metrics scrape timeout
( |
|
Metrics scrape timeout, in seconds |
Collection interval for ECS cluster metrics
( |
|
Collection interval for ECS cluster metrics, in seconds |
| Parameter label (name) | Default value | Description |
|---|---|---|
Domain name
( |
|
The domain name for the Jaeger Query service. |
Subdomain name
( |
|
The subdomain name for the Jaeger Query service. Jaeger will be available at {subdomain}.{domain} URL. |
Public DNS
( |
|
Choose "UseExisting" to provide public hosted zone Id where Jaeger DNS record should be created. Choose "CreateNew" to provision a new Route 53 public hosted zone with provided Domain Name and create Jaeger DNS record there. |
Public Hosted Zone Id
( |
|
Provide Route 53 public hosted zone Id if you selected "UseExisting" above. |
Private DNS
( |
|
Choose "UseExisting" to provide private hosted zone Id where Jaeger DNS record should be created. Choose "CreateNew" to provision a new Route 53 private hosted zone with provided Domain Name and create Jaeger DNS record there. |
Private Hosted Zone Id
( |
|
Provide Route 53 public hosted zone Id if you selected "UseExisting" above. |
Certificate
( |
|
Choose "UseExisting" to provide ACM certificate ARN to use to terminate SSL for Jaeger DNS record. Choose "CreateNew" to provision a new ACM certificate with DNS Domain validation and use it for Jaeger SSL termination. |
Certificate Arn
( |
|
Provide ACM certificate ARN if you selected "UseExisting" above. |
| Parameter label (name) | Default value | Description |
|---|---|---|
Quick Start S3 bucket name
( |
|
S3 bucket name for the Quick Start assets. This string can include numbers, lowercase letters, uppercase letters, and hyphens (-). It cannot start or end with a hyphen (-). |
Quick Start S3 key prefix
( |
|
S3 key prefix for the Quick Start assets. Quick Start key prefix can include numbers, lowercase letters, uppercase letters, hyphens (-), and forward slash (/). |
Quick Start S3 bucket region
( |
|
The AWS Region where the Quick Start S3 bucket (QSS3BucketName) is hosted. When using your own bucket, you must specify this value. |
Send us feedback
To post feedback, submit feature ideas, or report bugs, use the Issues section of the GitHub repository for this Quick Start. To submit code, see the Quick Start Contributor’s Guide.
Quick Start reference deployments
See the AWS Quick Start home page.
GitHub repository
Visit our GitHub repository to download the templates and scripts for this Quick Start, to post your comments, and to share your customizations with others.
Notices
This document is provided for informational purposes only. It represents AWS’s current product offerings and practices as of the date of issue of this document, which are subject to change without notice. Customers are responsible for making their own independent assessment of the information in this document and any use of AWS’s products or services, each of which is provided “as is” without warranty of any kind, whether expressed or implied. This document does not create any warranties, representations, contractual commitments, conditions, or assurances from AWS, its affiliates, suppliers, or licensors. The responsibilities and liabilities of AWS to its customers are controlled by AWS agreements, and this document is not part of, nor does it modify, any agreement between AWS and its customers.
The software included with this paper is licensed under the Apache License, version 2.0 (the "License"). You may not use this file except in compliance with the License. A copy of the License is located at http://aws.amazon.com/apache2.0/ or in the accompanying "license" file. This code is distributed on an "AS IS" BASIS, WITHOUT WARRANTIES OR CONDITIONS OF ANY KIND, either expressed or implied. See the License for specific language governing permissions and limitations.